Creating a Table of Contents
If you're a GoDaddy Email Marketing Power User you already know that she allows the use of some HTML constructs within your campaigns. Even if you're not, you may want to add a Table of Contents (sometimes called Named Anchors) to your campaign. It's now as simple as adding a clickable link!
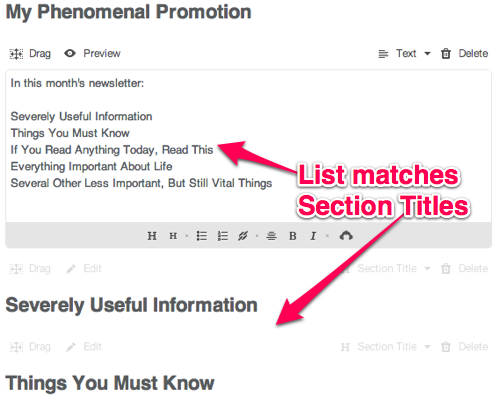
So, let's imagine you have a campaign with four or five sections in it, each of which is fairly long. It's not inconceivable that some users may not want to read the entire thing, and just jump to the sections that interest them. So you'll want to add a Table of Contents.
Step 1. Add new text module
To get started, you need to add a new text module to your campaign. Of course, a Table of Contents is useless at the bottom of your campaign, so you'll want to grab it by the drag area and slowly drag it to the top. You can do this in one step by dragging the module to just at the top of your browser window. That should cause the window to scroll up all the way to the top. Then, continue to drag it down into place.
Step 2. Add list of contents
Now that you've got a new, empty text module just where you need it, you'll need to add the Table of Contents info. In this example we'll make it a list, using the "unordered list" tool on the toolbar, but you can really use any type of styling you like. Some people prefer a single line of pipe ( | ) delimited links, others like a numbered list. Enter the titles of your sections, each on a new line.
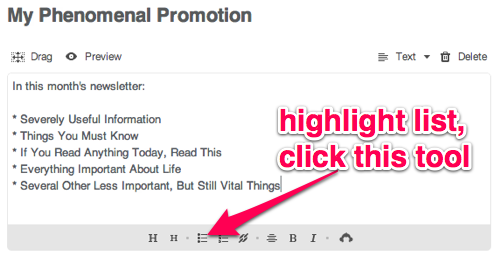
Now for an optional formatting step. Select all text in the list, and hit the unordered list button. This will simply place an asterisk at the start of each line which will turn into a list for you. You could just as easily have typed the asterisks yourself, but sometimes it's easier using the tools.
Step 3. Turn list into links
Next, you'll need to turn each item into a link. Select the text for an item (excluding the asterisk) and hit the link button, under the module.
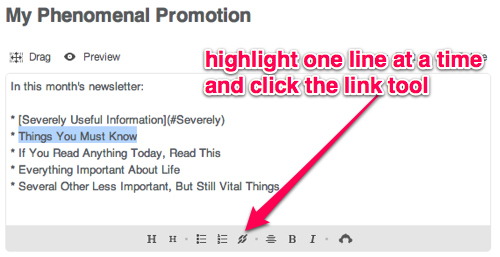
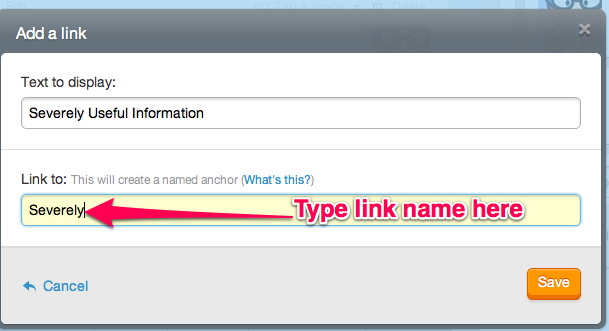
GoDaddy Email Marketing will insert the text you just highlighted, and provide a spot to add your link. Instead of a normal http:// type link, we're using a hash or pound (#) and the link name, like this: #link_name
Important! Do not use spaces here, for the link.
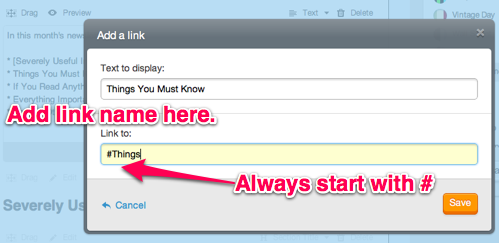
If you use the first word of the section name, it's easy to remember. We're linking each item in the list with the name of an anchor we'll add to each Section Title, in the next step.
In the end, each link should look something like this, in edit mode: [Link Text](#link_name).
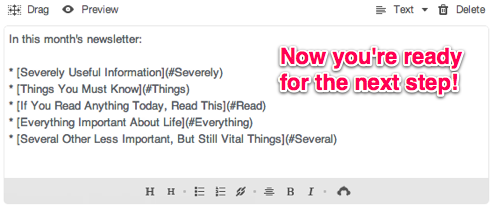
Step 4. Add named anchors, or links, to the destination section
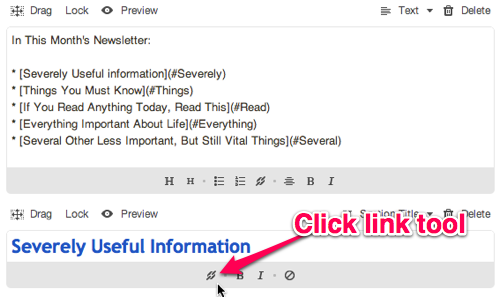
With the link names all set up, you just need to add the actual Named Anchors to the rest of your campaign, so those links know where to go. Click edit for each section title, add select the link button:
Then add in your link name. If you match the link name properly to the menu you just created, it will be recognized as an anchor. Notice the confirmation:
To add a named anchor anywhere else in the campaign that is NOT a Section Title, use the following html code at the start of each section:
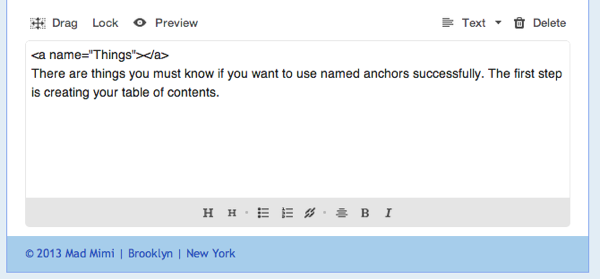
The link_name must, of course, correspond to the names you used in your Table of Contents, and note that you leave off the hash symbol here. Yes, upper and lower case matter! These named anchors will not be visible when you send the campaign so you needn't worry about that.
Step 5. Seeing is believing
And with that, you're done. You have a Table of Contents in your campaign. Isn't that great?!
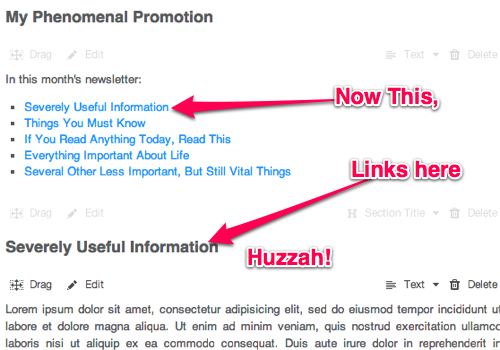
Make sure to save your work, and then click the Preview button to check out your new Table of Contents. In the preview page, your named anchors should work just fine, for you to navigate to any later section of your campaign.
Related Topics:
How Do I Change The Color Of My Links?
How Do I Add Content In The Middle Of My Campaign?
My Links Aren't Working!
Can I Preview A Campaign?