Using the Media Gallery in Quick Shopping Cart
The Media Gallery manages the images, PDFs, and SWF files you upload to Quick Shopping Cart®. It's available through the Storefront menu and the Product page. Using the Media Gallery, you can display one image per product with the One-Image option, or you can display up to ten images per product with the Multi-Image option.
NOTE: The Multi-Image feature is only available in Deluxe and Premium Quick Shopping Cart accounts. Using it, you can display up to five images per product in Deluxe accounts and up to ten images per product in Premium accounts.
Additionally, you can search for uploaded files, get links to uploaded files, and remove files.
We have two videos to help you with media galleries:
- Show Me Around Media Galleries provides an overview of Media Gallery's features.
- Step Me Through Media Galleries shows you how to use Media Galleries with your Quick Shopping Cart.
Use the Media Gallery through the Storefront menu to upload PDFs and SWFs and to get links to uploaded files. Use the Media Gallery through the Product page to assign images to products.
Using the Media Gallery in the Storefront Menu
You can upload images, PDFs, and SWF files using the Media Gallery available through the Storefront menu. Additionally, you can search for your uploaded files and get links to embed or link to uploaded files in fields that accept HTML in Quick Shopping Cart.
NOTE: If you need to assign an image to a product, use the Media Gallery available through the Product page.
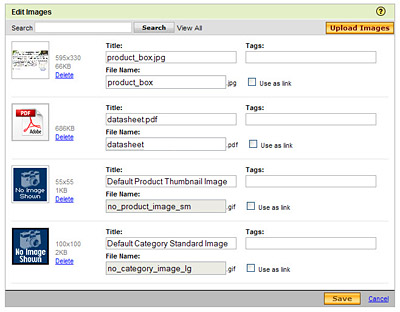
Uploading Images to Your Media Gallery
You can upload up to 100 images at a time directly to your Media Gallery. You also have the option to add a title and searchable keyword tags to each image.
NOTE: To upload multiple images at once, you need the latest version of Adobe Flash® Player. An alert displays when you click Upload Images if you do not have the latest version of Flash. Click the link on the alert to get the latest version.
To Upload Images to Your Media Gallery
- Log in to your Account Manager.
- Click Quick Shopping Cart.
- In the Quick Shopping Cart Account list, click Manage next to the Quick Shopping Cart account you want to use.
- From the Set Up menu, in the Design section, select Media Gallery.
- Click Upload Images.
- On your local drive, locate and select the images you want to upload, and click Open.
NOTE: Select multiple images by holding the Command key (Mac) or CTRL key (PC).
- (Optional) Update each image Title and add keyword Tags. This step will help if you elect to use an Excel spreadsheet to update image assignments.
- Click OK.
NOTE: Images uploaded on the Name, Logo, Contact Info page or on the Default Product Images page, are added to the Media Gallery.
Locating Images in Your Media Gallery
If you want to update the information for a specific image, locate the image by scrolling through all uploaded images or search for an image by title or keyword.
To Locate Images in Your Media Gallery
- Log in to your Account Manager.
- Click Quick Shopping Cart.
- In the Quick Shopping Cart Account list, click Manage next to the Quick Shopping Cart account you want to use.
- From the Set Up menu, in the Design section, select Media Gallery.
- In the Search field, enter an identifying term, and then click Search.
NOTE: To cancel your search and view all images in the Media Gallery, click View All.
Images display 10 per page by default. If you have more than 10 uploaded images, you can increase the number for Results Per Page or use the Previous and Next buttons.
Linking to and Embeding PDFs, Flash Files, and/or Images
You can link to or embed PDFs and SWFs from your Media Gallery in fields that accept HTML. Additionally, you can display images from your Media Gallery in fields that accept HTML by using the img src tag.
For more information, see Linking to Your Images in Quick Shopping Cart.
Using the Media Gallery in the Product Page
Use the Media Gallery that is available through the Product Page to assign images to a product, decide how many images you want to display per product, and upload product images.
NOTE: If you need to upload a PDF or SWF file, or link and/or embed content from the Media Gallery into an HTML field, use the Media Gallery available through the Storefront menu.
Assigning Images to a Product
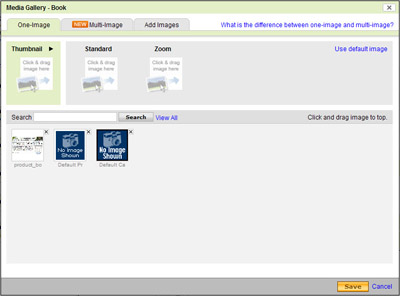
You can assign different images to display with each product. On a product's Media Gallery page, you can assign images to the product using either the One-Image or the Multi-Image option. There are three locations where product images display: Thumbnail, Standard, and Zoom.
- Thumbnail
- Displays the thumbnail image next to the product on your Products page and also when the product is presented as a Featured Item. Click the arrow in the Thumbnail setting section to set the thumbnail Display Options as Scale to fit or Full size.
- Scale to fit - Displays a 60x60 version of the image.
- Full size - Displays a full-size version of the image. The size that the image displays on the storefront is affected by the containing element. For example, if the storefront section in which the image displays has a maximum size of 256x256 pixels, the original image will be constrained to fit into that 256x256 box.NOTE: When the Category Page Style 3 is selected, the Standard Image (175x175) is used if the product is in One-Image mode; if the product is in Multi-Image mode, a 175x175 version of the Thumbnail is used.
- Standard
- Displays the image no larger than 175x175 pixels on the product detail page.
- Zoom
- Displays the full-size image in a new window when the Standard image is clicked.
NOTE: The system does not automatically increase the displayed size of the image. To effectively use the Zoom feature, you must upload a larger version of the image.
Previously, you were required to have at least one image associated with each product. You now have the option to not assign any images to a product.
Using the One-Image Option
This option allows you to assign one image to each of the different display locations.
To Assign Images Using the One-Image Option
- Log in to your Account Manager.
- Click Quick Shopping Cart.
- In the Quick Shopping Cart Account list, click Manage next to the Quick Shopping Cart account you want to use.
- From the Manage menu, in the Catalog section, select Products.
- Click the Assign Images icon next to the product you want to update.
- If necessary, click Close to continue to the Media Gallery.
- Select the One-Image tab.
- For each of the three display options, click an image from the list of images, and then drag and drop it to the appropriate location.
- Click OK.
Using the Multi-Image Option
This option allows you to assign up to five images to display with a single product in Deluxe accounts and up to ten images in Premium accounts.
To Assign Images Using the Multi-Image Option
- Log in to your Account Manager.
- Click Quick Shopping Cart.
- In the Quick Shopping Cart Account list, click Manage next to the Quick Shopping Cart account you want to use.
- From the Manage menu, in the Catalog section, select Products.
- Click the Assign Images icon next to the product you want to update.
- If necessary, click Close to continue to the Media Gallery.
- Select the Multi-Image tab.
- For each display location in the Thumbnail and the Product Images sections, click an image from the list of images, and then drag and drop it to the appropriate location.
- Click OK.
Using the Add Images Feature
While you can upload images directly to your Media Gallery from the Storefront menu, you can also add them to your Media Gallery when assigning images to a specific product. This feature also allows you to add titles and searchable keyword tags to your images.
To Add Images to the Media Gallery
- Log in to your Account Manager.
- Click Quick Shopping Cart.
- In the Quick Shopping Cart Account list, click Manage next to the Quick Shopping Cart account you want to use.
- From the Manage menu, in the Catalog section, select Products.
- Click the Assign Images icon next to the product you want to update.
- If necessary, click Close to continue to the Media Gallery.
- Select the Add Images tab.
- Click Browse.
- On your local drive, locate and select the images you want to upload, and click Open.
NOTE: You can select up to 100 images by holding the Command key (Mac) or CTRL key (PC).
- (Optional) Update each image Title and add keyword Tags.
- Click Upload.